
In the most recent email newsletter that went out before this post, I mentioned that I’m shifting my focus to the work I need to put in to earn a turbo pin from Gabe White. Additionally, I happen to know that a reader or two will also be attending the very same Gabe White’s Pistol Shooting Solutions course I will be attending in October hosted by KR Training. As such, I figured that sharing what I’m specifically doing in my daily dry fire to work towards earning that pin in this month’s dry fire post will be appreciated. At least by some of y’all and at the very least by those who are looking to earn a pin now or in the future.
There really is nothing special about what I’m doing. I’m simply running the four skills tests, which I’ve written about in detail before, in every dry fire practice session with the equipment I intend to use configured exactly as I will use it.
In the sections that follow, I’ll cover my dry fire dojo and equipment set ups. Then I’ll suggest a practice plan that can be adapted to one’s current skill level and pin goals. Finally, we will look at how to verify the progress with dry fire.
Sounds good?
Right then. Let’s start.
Dry Fire Dojo Set Up
Those of you who aren’t familiar with Gabe White’s four technical skills tests should take a moment and go read this post to become familiar with them.
Since all of the tests are run from seven yards against either an IDPA or USPSA torso target, we can print up one of these downloadable 1/3 scale IDPA target or 1/3 scale USPSA target made available by our friends at ConcealedCarry.com. I prefer the IDPA target because the IDPA center zero ring has less surface area than the USPSA center A zone making it a less forgiving target to practice with. While the USPSA upper A zone is less forgiving than the IDPA upper zero ring, Gabe White will use a 4″ circle label on USPSA targets making it effectively an IDPA upper zero ring. The result is that using the scaled IDPA target allows us to practice against the more difficult of the two targets used for the skills tests in class. For that reason, I think the scaled IDPA target is the way to go.
To simulate seven yards with the scaled targets, we need to stand at least 2.3 yards away from the scaled targets. Two and half or three paces will work just fine. Getting used to practicing at three paces isn’t a bad idea since it gets us comfortable working with a more difficult target than we will face in class.
Equipment Set Up
I can’t think of a good reason not to make practice as close to the real thing as possible. Trust me, the details matter.
If it’s at all possible, then wear clothes that you will actually wear in class or at least similar clothing to what will be worn.
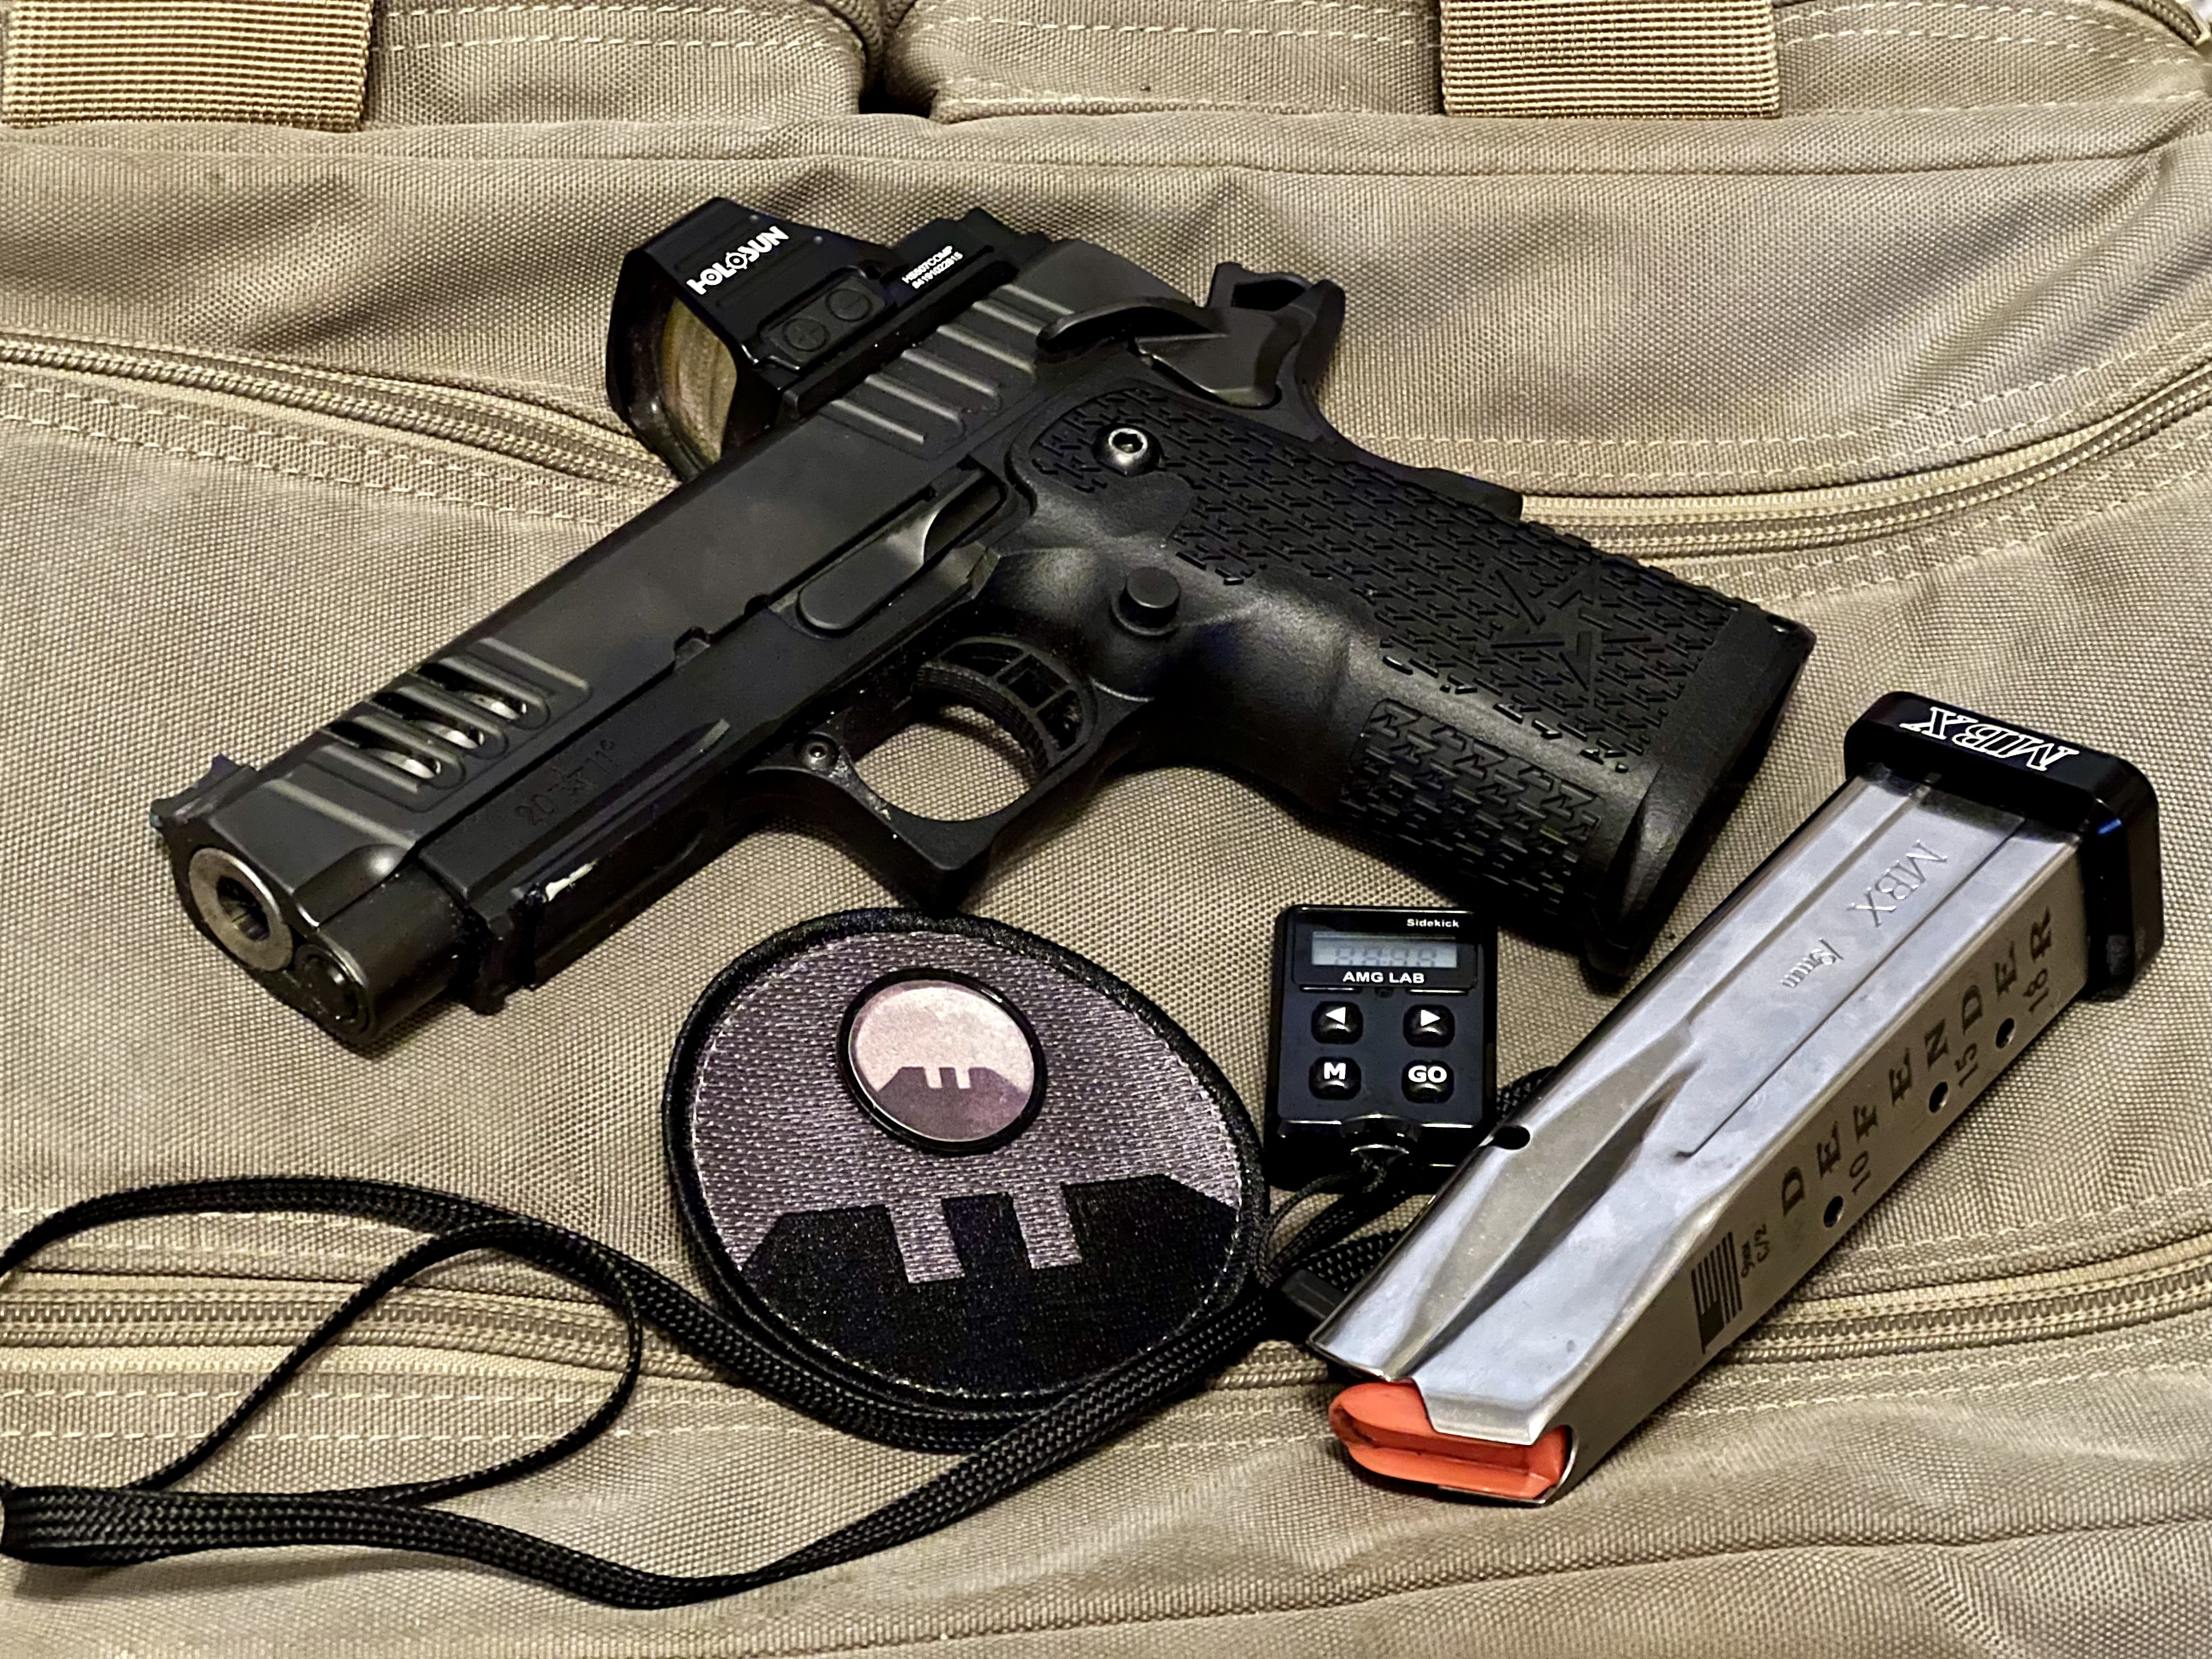
Use the gun that will actually be used. In the holster that it will be in. In the position that it will be in. Concealed in the manner it will be concealed in.
Using a weighted dry fire magazine isn’t a bad idea either. To be transparent, I’m not doing this yet because I haven’t found weighted magazines for the pistol I will be using in stock yet.
Practice Plan
Heads up! You are going to need a shot timer. If you don’t have one yet, then I’m going to recommend the AMG Lab Sidekick cause it’s an awesome dry fire practice shot timer. If that’s not the one for you, then go read this post for other options.
I don’t know about you, but I’m lazy. So I’ve arranged the order of the skills tests so that I can limit the amount of shot timer reconfiguration to the absolute minimum. The order is: Failure to Stop drill, Immediate Incapacitation drill, Bill drill, and Split Bill drill. This order makes it so that we start on the fastest drill and finish with the slowest drill. The result is that we will only have to increase the par time as we move from drill to drill regardless of the pin goal one is working towards.
No Pin Practice Plan
Those who have never shot or dry fired any or all of the skills tests drills should start here. The goal for this plan is to practice practicing. I’m aware that is a little meta, but it’s important because it gets us familiar with the drills. More specifically it gets us familiar with the process for executing each drill and familiar with the dry fire process. I’ve said again and again like a broken record, but the most important thing for dry fire practice to be effective is that we have to be mindfully present in practice. We have to be aware of everything we are doing, feeling, and seeing while focusing on the execution of the drill and not thinking about anything else.
This practice plan is simple though. Perform each drill without a time limit as many times as time allows. Time is limited by both the available practice time and the stamina we have to stay mindfully aware during practice. Stop once fatigue sets in or we start getting distracted.
Dark Pin Practice Plan
Once familiar with the drills and with dry firing the drills, we can start working towards executing those drills within the dark pin time limits.
For reference, the dark pin time limits are:
- Failure to Stop drill: 2.9 seconds
- Immediate Incapacitation drill: 3 seconds
- Bill drill: 3.5 seconds
- Split Bill drill: 4.7 seconds
For each drill, set the par time on the shot timer and perform the drill a set number of times before going on to the next drill. Personally, I run the drill five times, evaluate my performance and fatigue, and then decide if I should do five more before moving on to the next drill. The repeat feature on timers comes in real handy here so that I don’t have to keep count and instead focus on running the drill.
As mentioned in part four of this series of posts, a common mistake is to focus on beating the timer instead of focusing on the process of executing the drill. Not only does this lead to frustration when one doesn’t beat the timer, but it also introduces bad habits that we later have to break. So make sure to focus on drill and only evaluate the results after running it. Use what was felt, seen, and observed through mindful awareness to execute the process sooner. Can we get away with seeing less? Can we parallelize any sub-processes safely? Is there unnecessary movement that can be cut out? As we get better at executing the process, beating the time limits will come.
Astute readers will have noticed that the time limits weren’t adjusted with the 0.25 second concealment or active retention bonus. The omission was intentional. That time bonus is a buffer that can be used to make up a stray C zone (or minus one zone) hit. As such, I think it’s a mistake to depend on it.
Light Pin Practice Plan
This plan is exactly like the dark pin plan except for the adjusted time limits which are:
- Failure to Stop drill: 2.25 seconds (use 2.2 if your timer doesn’t allow adjustments smaller than tenths of a second)
- Immediate Incapacitation drill: 2.5 seconds
- Bill drill: 2.5 seconds
- Split Bill drill: 3.5 seconds
I will encourage those with dark pin goals to start working towards a light pin as they are comfortably meeting dark pin times in practice consistently. At that point, dark pin times are now what Gabe White calls “on demand” practice and it would behoove us to start throwing a little “pushing” practice in the dry fire sessions. There is no reason to only use one plan either. In fact, I’d encourage folks to start with “on demand” practice, then doing some “pushing” practice, and then wrapping up with some “on demand” practice to end on a good note and keeping “on demand” performance the most recent performance.
Turbo Pin Practice Plan
If you guessed that this plan is just like the other pin plans adjusted for turbo time limits, then you are correct. Those time limits are:
- Failure to Stop drill: 1.7 seconds
- Immediate Incapacitation drill: 2 seconds
- Bill drill: 2 seconds
- Split Bill drill: 2.6 seconds
Everything I said in the light pin plan still applies. If light pin times are comfortable and consistent, then it’s time to start pushing with these times.
100% Grand Master Speed Practice Plan
In the difficulty analysis post of Gabe White’s technical skills tests, I estimated the time a USPSA Grand Master (GM) takes to execute each of these drills using a methodology I stole from Karl Rehn’s and John Daub’s book, Strategies and Standards for Defensive Handgun Training. These times are shorter than the turbo pin time limits and can be used for “pushing” practice once comfortable and consistent with the turn pin times.
The GM par time limits are:
- Failure to Stop drill: 1.5 seconds
- Immediate Incapacitation drill: 1.8 seconds
- Bill drill: 1.9 seconds
- Split Bill drill: 2.3 seconds
Live Fire Verification
Dry fire is great, but it’s even better when coupled with live fire verification.
If at all possible, run these drills in a live fire setting using the time limits for your corresponding pin goal.
For some of us, drawing from a holster at the local range is going to be a nonstarter. Not to worry, we can run these drills from a ready position and decrease the time limits accordingly by 0.5 seconds. Granted, we risk ruffling some feathers with the staff at the same ranges that don’t allow holster work by sending six rounds in 1.5 seconds down range for an adjusted turbo pin Bill drill.
Now go do the work. Earn your pin. Thank me later.


One response to “Dry Fire Part 6: Gabe White’s Technical Skills Tests”
[…] classic shooting drill you all should try. If that’s too simple for you, try Gabe White’s Technical Skills Tests either dry fire or with real […]