
One unexpected perk of writing about dry fire practice and chatting it up on social media? Shot timer makers sliding into my email inbox, asking me to take their gear for a spin. Talk about serendipity. There aren’t dozens of quality shot timers out there—maybe a dozen at most—but with prices ranging from $60 to $300, collecting them all isn’t exactly in my budget. So when Shooters Global mailed me their SG Timer 2, a $299 contender, it felt like a golden ticket. A chance to unbox, test drive, and spill the beans to you all. A win-win-win, assuming this thing lives up to its price tag and doesn’t flop.
Before we explore the timer, a quick note on our relationship. This blog is affiliated with Shooters Global, meaning that if you purchase directly from their website via a link here, I receive a small percentage of the sale at no additional cost to you. It’s a way for readers to support my work while getting a product they want. However, I want to be clear: this review reflects my honest opinion, even if it risks ending that affiliate relationship. Your readership and trust are my top priorities, and I won’t compromise that for anything.
With that out the way, let’s dig into the SG Timer 2.
In the Box
If you came here to read about the packaging, you’re in for a disappointment. I got the SG Timer 2 over a month ago, and honestly, I don’t remember much about the box. I didn’t snap any pictures either. Let’s just call the packaging unremarkable. What I do recall is how pumped I was to get my hands on it—I couldn’t wait to start using it. The feature I was most stoked about? The video recording capabilities that might level up the stage videos I post on social media.

Here’s what came in the box:
- The SG Timer 2.
- The magnetic mount with belt clip—Shooters Global calls it the U-Grip.
- A USB-C charging cable I’ll probably lose.
- A lanyard I’ll never use.
- An itty-bitty quick-start guide.
That USB-C cable gave me a little pause. Being able to swap in fresh batteries on a dying timer is something I value, especially when I’m teaching classes—more on that later. For now, the two things that grabbed my attention were the timer itself and the U-Grip mount. We’ll start with the timer, since that’s probably what most of y’all are here to read about anyway.
The SG Timer 2
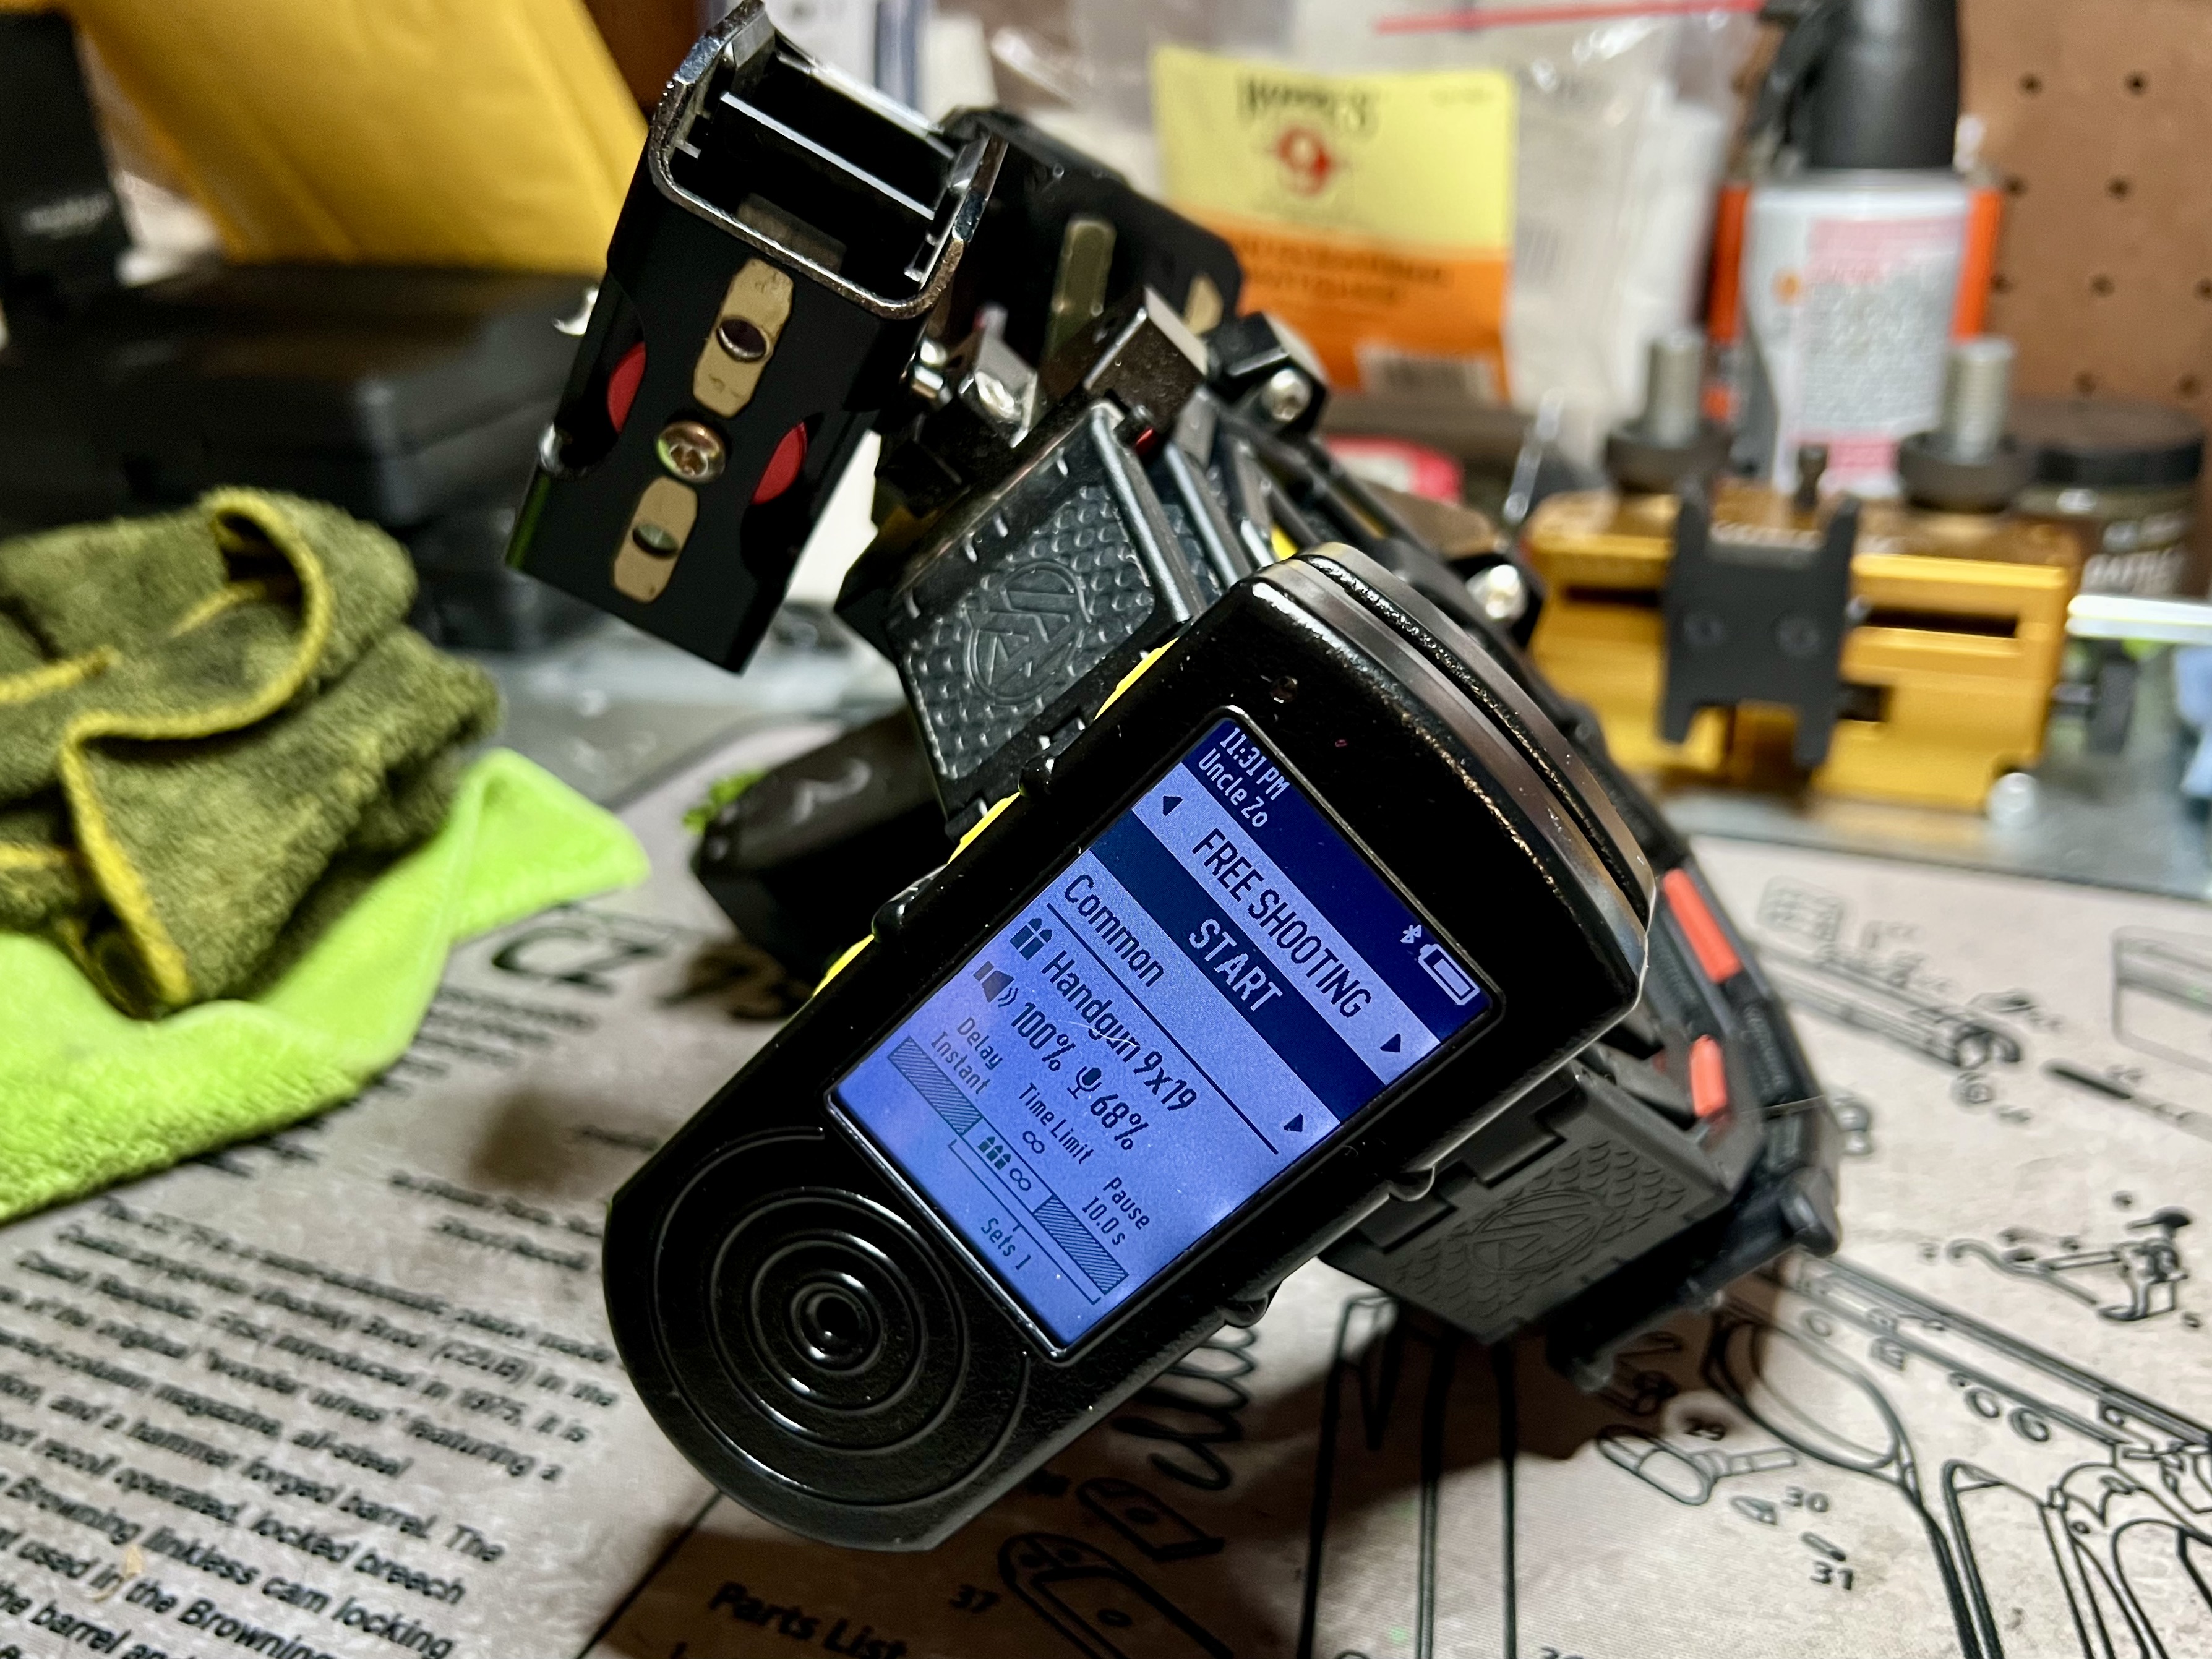
Physically, the timer feels solid. It’s small and light—comfortable to hold, with my fingers naturally resting on the control buttons for an intuitive grip. The display sits right where you’d look, making it a breeze to read. Honestly, it just looks and feels good in hand.

Starting from the top down, there’s a light sensor in the top left corner. It reads ambient conditions to adjust the display’s backlight automatically—off in bright light to save battery, which is impressive given the 100-hour runtime per charge. Below that is the 2-inch, 172 PPI display. It packs a ton of info but stays legible, assuming you know your way around it. More on the interface and features soon.
At the bottom, you’ve got the shot sensor—adjustable and sensitive. Crank it to max, and it’ll pick up everything, maybe even a butterfly fart. That’s ideal for dry fire practice and powers the smart mode feature. Paired with the adjustable echo filter, it might even work for live fire at a busy indoor range—though I haven’t tested that yet.

On the left side, three control buttons: top and bottom for navigating menus and settings, middle for selecting. When powered off, hold the middle one a few seconds to turn it on. They’re big enough for any finger (thumb included) and give tactile feedback that confirms presses without guesswork.
Flip it over, and there’s the buzzer—volume adjustable. At 5%, it’s perfect for dry fire without bugging the household or riling the dogs. At full blast, the 110 dB output is loud enough for an instructor to run a firing line and be heard by everyone. That’s a big step up from the first-gen timer, which instructors griped wasn’t loud enough. Nice to see Shooters Global taking feedback seriously.

Also on the back: a wireless charger I haven’t touched and stronger magnets for a beefier lock with the U-Grip. That’s another fix from the first-gen model, where shooters and instructors flagged the connection as too weak. For anyone still skeptical about the U-Grip, Shooters Global added two screw holes on the timer’s back. You can ditch the mount and screw the belt clip directly onto the timer instead.
Last but not least, there’s a small lanyard hole on the bottom.
So far, so good, right? I’d say so—but let’s check out the U-Grip mount before diving into the timer’s features.
The U-Grip
The U-Grip’s an interesting mounting solution that’s had my attention since the first-gen SG Timer. Being able to snap the timer onto my belt—or yank it off—without wrestling a clip is a game-changer. I hate fiddling with those things; it’s tedious and annoying. But I was skeptical about this setup after hearing dozens of stories about the timer dropping off belts during aggressive drills, even with beefier magnets in the second-gen model.


The design’s simple and slick. It’s a base packed with powerful magnets, and the timer locks in with a half-circle peg on the U-Grip that slots into a notch on the timer’s back. No fuss, no overcomplicated parts—just clean and functional.
On the U-Grip’s rear, there’s a sturdy, removable metal belt clip. It’s built to grip just about any belt from 1.5″ to 2″ wide—think thick competition rigs, tactical belts, or even battle belts—and it holds firm.

So, is the lock between the U-Grip and SG Timer 2 secure this time? After running multiple stages at local matches with the U-Grip on my gamer belt and the timer locked in place, I’ve had zero slips or drops since day one. The issue’s fixed. This system works—at least for me, and I’d bet it’ll hold up for others too.
Guess it’s about time we circle back to the timer’s high-tech and smart features.
Features Galore
One thing the SG Timer 2 doesn’t lack? Features. Holy smokes, it’s got a bazillion of them—almost too many to know where to start. So, I’m breaking this section into subsections. That way, if you’re the type who skims instead of reading straight through, you can zero in on the features that pique your curiosity while breezing past the rest.
Let’s jump down the rabbit hole.
Range Officer Mode
The best place to start? The SG Timer 2’s two modes: Personal mode and Range Officer (RO) mode.
Personal mode’s where most owners will live. It’s the hub for all the features we’ll cover soon—everything’s accessible and tweakable right there.
RO mode, though, strips things down for range officers. Simplified menus and a clean display cut distractions, making it a breeze to pick up. It’s a smart move for match ops.
I haven’t tested it myself, but word is the Bluetooth link between the SG Timer 2 and PractiScore’s app is shaky—at least as of this post. Here’s hoping that gets sorted soon; clubs could use another timer option. That said, at $299, the SG Timer 2 would still be the priciest pick among PractiScore-compatible timers out there.
That aside, RO mode splits into two main functions: Shooting and Walkthrough.


The Shooting function is a bare-bones shot timer. You can still tweak:
- Sensor sensitivity, echo filter, and volume.
- Instant, delayed, or random start.
- Time limit, or “par time” (useful for USPSA/IPSC Fixed Time scoring).
- Shot limits (handy for IDPA Limited or USPSA/IPSC Virginia scoring).
It also keeps a session history, letting an RO flip back through prior stage times. You can clear it anytime, though I’d guess ROs might only bother between squads—if at all.
The Walkthrough function’s a simple countdown timer for a squad’s stage walkthrough time. It’s great for keeping matches on track or enforcing time limits.
Now, let’s swing back to the features packed into Personal mode.
Free Shooting Mode
Free Shooting mode is the live-fire mode I know best. It’s basically a shot timer on steroids, loaded with settings. Thankfully, it’s got seven top-level presets to stash your go-to configs, plus a handful of finer-grained presets for quick tweaks.
The best way to show off its depth? Walking through the screens. We’ll start with the main shooting screen, which gives you:
- A start button.
- Access to the preset menu (leads to settings changes), showing the current top-level preset (out of seven).
- An info display with:
- Gun type sensor config preset in use.
- Buzzer volume.
- Sensor sensitivity level.
- Start type (instant, delayed, random delay).
- Time limit.
- Pause time (time between sets to prep—super handy for training).
- Number of sets.


From the preset menu, you can pick another preset, add a new one, or dive into the settings of the current one. That takes you to the preset config screen, where you can delete it or tweak:
- Sensor sensitivity, echo filter, and volume (manual or via gun type preset).
- Spy More (more on that later).
- Start delay.
- Number of sets (great for back-to-back drill reps in training).
- Time limit, or “par time” (useful for USPSA/IPSC Fixed Time scoring).
- Shot limit (handy for IDPA Limited or USPSA/IPSC Virginia scoring).
- Pause time.
Yeah, it’s a lot. Everything you’d need to set up the timer for live-fire drills, run a firing line, or tackle a stage. And yet, there’s another live-fire mode to check out. Let’s hit that next.
Shooting Drills Mode
Full disclosure: I haven’t touched this mode yet. It’s brand new, dropped in the latest firmware update that I only installed right before writing this review. At a glance, though, it feels a lot like the dry fire drills mode (up next), which I’ve spent serious time with.
The interface shifts quite a bit here. The big switch? Top-level presets are now preconfigured drills, not sensor settings. That’s a win for preplanned practice and training sessions—something we should all do to squeeze max value from range time and ammo. Plus, the screen flow’s reworked to cut down on timer fiddling and boost shooting time in this mode.
Let’s walk the screens again to see what’s different. The main shooting screen gives you:
- A start button.
- Access to the drill menu (leads to settings), showing the current drill (out of 25).
- An info display with:
- Gun type sensor config preset in use.
- Buzzer volume.
- Sensor sensitivity level.
- Echo filter delay.
- Start type (instant, delayed, random delay).
- Total drill time (time limit plus pause time across all sets).
- Number of sets.
- Number of shots.
- Number of targets.


From the drill menu, you can pick another drill, add a new one, or tweak the current one’s settings. That lands you on the drill config screen, where you can delete it or adjust:
- Gun type or manual sensor settings.
- Start delay.
- PAR setup (time limit, number of sets, number of shots, pause time).
- Targets.
Yeah, it’s a lot—again. It’s an intriguing feature, but I’m not sold on using it yet. Not because it’s useless—it’s just another thing to learn. Still, I’ll give it a shot, and that might change my tune.
Next up, let’s hit dry fire mode.
Dry Fire Drills Mode
Dry Fire mode’s a skill-seeker’s best friend—or it was, until the latest firmware threw a wrench in it. I’ve logged more hours here than all other modes combined. Like Shooting Drills mode, it’s drill-central, but the interface feels tighter—dare I say, more refined. Menu flows differ too, tossing in the “wait time” setting, which I’ll unpack later.
Let’s hit the main shooting screen first. It gives you:
- A start button.
- Access to the drill menu (leads to settings), showing the current drill (out of 25).
- An info display with:
- Gun type sensor config preset in use.
- Buzzer volume.
- Sensor sensitivity level (should always be 100% for dry fire).
- Wait time.
- Start type (instant, delayed, random delay).
- Time limit, or “par time.”
- Number of sets (locked at 1 with current options).
- Pause time.
- Number of reps.

From the drill menu, you can pick another drill, add one, or tweak the current one’s settings. That drops you into the drill config screen, where you can delete it or adjust:
- Gun type or manual sensor settings (wait time replaces echo filter).
- Start delay.
- Repeats (instead of sets).
- PAR setup (time limit and pause time).
- Targets.
This setup feels more polished than Shooting Drills mode. Maybe it’s because dry fire’s had longer to mature. It’s still evolving, though—before the latest update I just installed, you could swap between classic and smart timer modes. Now it’s smart mode or nothing, and wait time’s the key.
Wait time tells the timer how long to wait for silence before calling a drill done. It filters out similar sounds like magazine drops, insertions, slide racking, safety clicks, or those pesky butterfly farts—anything mimicking a hammer fall or striker release. The win? Pinpoint trigger break detection for single-shot drills. The downside? It flops for multi-shot drills, since most guns leave you with a dead trigger after the first press.
The settings still make the SG Timer 2 a dry fire contender. But here’s the rub: the new firmware axed classic mode—your traditional timer beep-and-sense functionality, my go-to for multi-shot dry fire practice. I’m not alone in missing it; the community’s been vocal. Good news? Shooters Global’s ear’s on—a recent announcement says some lost features, including classic dry fire mode, are coming back.

I know this post is getting long—maybe obnoxiously so—but we’ve got a couple more features to hit. Good news: those should be quick.
Video Recording
Remember those video recording capabilities I was hyped about early in the review? Doesn’t matter if you do—here they are now.
To be clear, the SG Timer 2 doesn’t have a camera or record video solo. It pairs with Shooters Global’s Drills app (Android, iOS, even Apple Watch) via Bluetooth. We’ll dig into the app more in a future SG Timer GO review—since that timer basically demands it—but for now, know this: the app uses your phone’s camera to capture video with synced shot timer data overlaid. Very cool!
I was mostly jazzed about leveling up my social media stage videos, but this feature’s real shine is performance analysis. Without it, you’re bouncing between video timestamps and timer data—not tough, just tedious and time-sucking. Having the shot data right on the video cuts the back-and-forth, streamlining analysis and saving a chunk of time.
At first, I leaned hard into it for dry fire, dissecting my mechanics. Occasionally, I’ve had someone record me running live-fire drills. Check out this YouTube Short for a taste of what it can do:
I was already sold on this feature—something I’ll use, maybe abuse, probably for years. But it didn’t quite scratch my match stage video itch. By itself, I’d need to convince the RO to use my SG Timer 2 to get that embedded data. Fat chance at local matches, where PractiScore and its compatible timers rule the day.
Bummer.
Then I discovered Spy Mode.
Spy Mode
Spy Mode’s a wild one. Enable it, hit start, and the SG Timer 2 goes into standby, listening for another timer’s buzzer. Once it hears that beep, it kicks into gear, recording shot data like usual. On its own? Meh, I don’t get it. Paired with the video recording feature, though? Absolute banger for juicing up those social media stage videos and fueling video performance analysis.
It’s quirky and takes some setup. First, you need to know the other timer’s type and pray it’s on the supported list—different buzzers, different tones. Then enable Spy Mode with the right timer selected. For me, it’s straightforward: Is the RO using an AMG Lab Commander or a RangeTech timer? Those are the only PractiScore-compatible ones I see at local and big USPSA or Steel Challenge matches.
Once it’s dialed in, here’s the drill:
- Hand off your phone with the Drills app open, ready to record.
- Hit start on the Spy Mode-enabled timer.
- Wait for the buzzer.
- Sling lead.
I’ve found the U-Grip at the 8 o’clock spot on my gamer belt—right behind the last mag pouch—works like a charm. It’s easy to reach for the start button, and it catches the buzzer most of the time while still snagging all my shot data with the sensor sensitivity at 70%.

Bada bing, bada boom! Instant video for social media and performance analysis. Okay, maybe not “instant”—it’s a bit involved. Still, it’s not rocket surgery or brain science.
That’s it for the features. Let’s tackle drawbacks and shortcomings before wrapping this thing up.
Drawbacks & Shortcomings
The SG Timer 2’s bells and whistles are slick, but they come with two big drawbacks that might be deal-breakers for some: a steep learning curve and a clunky user interface.
I might be dating myself here, but I’m usually quick with new tech. Still, this timer’s tripped me up more than once. Take this example: I was at KR Training with Karl Rehn, prepping for a morning class, when he asked me to video him running a drill for documentation. Perfect chance to flex the timer’s video recording feature, right? He agreed. I set up the drill, prepped the timer, gave the commands, hit the start button—and… nothing. Spy Mode was on. I’d missed it, even though the display screamed it while I was setting up. No sweat, I’d fix it. Apologized, fiddled, gave the commands again—nada. Forgot to highlight the start button; instead, I’d navigated into settings. Looking like a total goof, I apologized again, fiddled some more, gave the commands—beep. Finally.
I’ve got more stories like that, but they’re getting rarer as I get the hang of the SG Timer 2.
Even so, some frequent tasks still take way too many steps. Setting a par time from the home screen (start button highlighted) goes like this:
- Press down once to highlight the preset (more than once, and you’re cycling through presets, adding steps to backtrack).
- Press the middle button.
- If you’re on the right preset, press middle again.
- Press down four times to reach the time limit.
- Press middle to enter.
- Press or hold up/down to adjust in 0.1-second increments.
- Press middle to lock it.
- Press up four times to hit “apply.”
- Press middle to save.
That’s nine steps, at least eleven button presses. Worse, the time limit’s right there on the home screen, tempting me to highlight it directly with down. Nope—not happening. I end up cycling through presets instead, frustrated. It’s happening less, but the button-mashing slog’s unchanged.
Sharp-eyed SG Timer 2 vets might say RO Mode cuts it to eight steps and ditches preset cycling. True, it sidesteps that mess, but it’s not really a step saver—the eighth “back” press doesn’t land you on the home screen with start highlighted (at least not in firmware v61, current as of writing). It’s still nine moves, just trading preset slip-ups for navigation risks. Point is, it’s a clunky haul.
Then there’s the “make sure start’s highlighted or middle won’t work” deal. Forgetting that after tweaking settings drives me nuts. A dedicated go button—maybe topside or right-side—would be a godsend.
One more note: in the short time I’ve had it, new firmware’s dropped, adding features and tweaking the UI. The Drills app got a big update too—cut some stuff, added others, shook up the interface. I don’t know how often these overhauls hit, but when they do, it’s back to school to learn again. The flip side? Evolving software might smooth things out down the line.
For me, the learning (and occasional relearning) curve and clunky UI aren’t deal-breakers—especially the more I get to know it. But for folks wanting a simple, no-fuss timer? This might send them running for the hills. Don’t get me wrong, I dig the features. They’re just a double-edged sword.
Verdict
Drawbacks and rants aside, I’m vibing with the SG Timer 2 on a lot of fronts. But let’s be real: that $299 price tag stings.
I’d say it’s overkill for anyone with a single purpose in mind—dry fire practice, live fire drills, running a firing line, or managing a match. The exception? Video performance analysis. It’s the only timer I know of that nails that, and it might justify the cost there.
But stack two or three use cases, and the price gets easier to swallow. It’s cheaper than buying multiple timers, which is nice—though it’s not a one-timer-to-rule-them-all. Take running a class with constant par time tweaks: the SG Timer 2’s not my pick. Even if I could preload drills in Shooting Drills mode (maybe possible, haven’t tried), the pre-class setup time might not beat a timer built for quick adjustments. And it sure doesn’t touch a stopwatch and whistle, which I’d prefer over the SG Timer 2 in that scenario.
Bottom line: the Shooters Global SG Timer 2 is a solid, feature-packed option, quirks and all. It’s worth a look. For folks juggling multiple timer needs—especially with video analysis in the mix—it’s a strong contender that could easily justify the $299. I’d peg it as best for serious competitive shooters or instructors offering video breakdown services. Personally? If I’d bought it myself, I wouldn’t be kicking myself.

Leave a Reply