When folks first get into guns and learn to shoot, the process of firing a shot is usually broken down into three distinct steps: aim, press trigger, and bang. This is a simple and effective way to get started. However, this simplified three step process falls short in a lot of ways and can actually result in some bad habits that may need to be broken as a person gets better at shooting. This is especially true when a person wants to improve their defensive shooting skills.
To begin exploring this, let’s put the three step process in the context of a self defense situation and add a draw step to start with and a holster step to finish with. That would make the process look like the following diagram.

The biggest problem with this process is that it assumes only a single shot will be needed to end a defensive encounter, which is rarely the case. So let me redraw this and a decision box. to create a cycle that allows for additional follow up shots which may be required to end such an encounter.
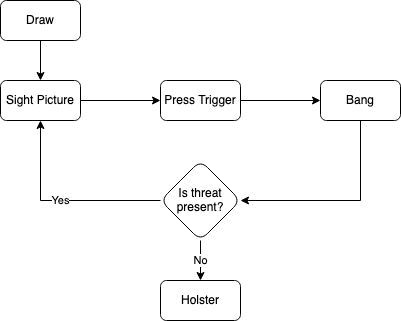
This is a vast improvement because we now have a cycle that allows us to employ follow up shots to end a defensive encounter. However, there is one big problem with this. According to defensive gun use research, data indicates that more often than not a defensive encounter is ended when a defender brings a gun to bear but without taking a shot. That means the aggressor is likely to change their mind after a gun is drawn. With this in mind, firing a shot at a target that is no longer aggressive could land the defender in a heap of legal trouble. Let me make another adjustment.
In a sense, this flow and cycle will work for a defensive counter. Let’s summarize it. A threat is present that results in a defender drawing their gun. Now that the defensive gun is in play we have to make a decision, to shoot or not to shoot. If the aggressor changed their mind and there is no longer a threat present, then the defender can put away the gun. If the aggressor is still posing a threat, then the bang cycle is executed and shot is fired. We are back to a decision point, to shoot again or not to shoot again.
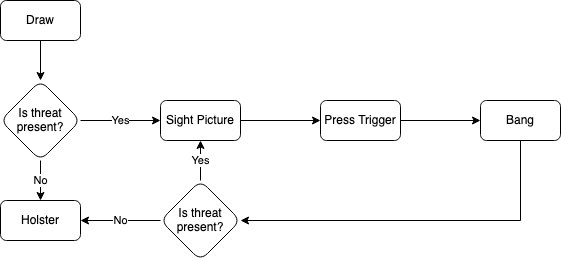
Perfect right? Not quite. While the process is adequate it is far from optimized. So let me offer another improvement.

There is a small but significant difference in this iteration of the cycle. That is when the decision to shoot or not to shoot takes place and that is after a sight picture has been established. This might seem trivial, but this process allows one to shave fractions of a second between making the decision and taking a shot. Let’s walk through it. A threat is present that results in a defender drawing their gun and aiming. At this point no shot has been fired and we can take a minute to make the decision while already having a good sight picture. If the aggressor is dissuaded and the threat no longer persists, then the gun can be put away. If the threat is still present, then the modified cycle continues as the trigger is pressed, the gun goes bang, and the defender establishes another sight picture before making the decision to or not to shoot again. This results in always establishing one more sight picture than triggers pressed and the decision to shoot always happening after a sight picture is established, but before the trigger is pressed.
Now it’s perfect right? I don’t know about perfect but it is optimized. Even so, it is missing a bit of detail that will be important for folks who want to be able to shoot faster. Let me expand on this diagram one more time.

This version of the bang cycle includes a few additional details that in my opinion further improve the bang cycle by explicitly pointing out when finer grained trigger manipulations should occur in order to reduce the time it takes to complete the cycle. I think it’s worth mentioning that I’ve placed the step to begin taking up the trigger slack before the decision to shoot is made, which some folks will point out, it contradicts the third rule of gun safety (only put your finger on the trigger when you are ready to shoot). While I can understand that sentiment, I’d argue that the decision to shoot was actually made when the gun was drawn and we are now working towards making the decision to interrupt the shooting process and not continue shooting. Again, this version of the cycle is in my opinion the optimal version in detail. It also requires a high level of trigger manipulation skill and being able to call on it while under stress in order to avoid the “taking up trigger slack” becoming the “press trigger” step unintentionally.
Another thing to point out is that these cycle diagrams also make the assumption there is only a single target and does not include transitions. Not to mention all of the other decisions our brains have to make while processing information from the encounter which is dynamic in nature. That said, I think the last version of the bang cycle diagram does provide a much better description which can be used to develop better skills in comparison to the basic three step process that folks most often learn when they begin learning to shoot.