
The ATN X-Sight 4K Pro 5-20x Smart Day / Night Riflescope is my first acquisition into the world of night vision which was prompted by my growing interest in night hunting or more specifically hunting hogs at night for which I’m in the process of repurposing the AR-10 for. While I haven’t dabbled much with night vision devices (NVDs), I have researched them enough to learn that there are several different technologies and there is a very wide cost range associated with NVDs. This particular offering from ATN, which I’ll be referring to as the ATN from here on out, is a very budget friendly option. I share this because I’ll have to balance my bias for higher quality (and more expensive) optics against the value proposition from the ATN.
One other thing to note before diving into this review is that I’m not sure how my objective lens to ocular lens review approach to optics will play out in this review as the ATN scope resembles a video camera more than it does a traditional riflescope. Nevertheless, we will find out how well this approach works.
For about $800 street price, the purchase includes:
- The ATN X-Sight 4K Pro 5-20x Smart Day / Night Riflescope itself,
- an eye cup,
- a sunshade,
- two 30mm rings,
- a L-shape 30mm ring,
- a ring top with picatinny rails at the 3 and 9 o’clock positions,
- a IR850 infra-red illuminator flashlight (with a picatinny mount),
- two CR123A batteries (for the IR850 illuminator),
- two allen wrenches,
- a USB-C cable,
- a scope cover,
- a lens tissue,
- a quick start guide,
- and a manual.
At first glance, all of the extras included in the box basically means one doesn’t need to go out and buy other things one normally would before mounting the scope to a rifle (like scope rings). For the price point, this is pretty nice.

Starting from the front of the scope we have the objective lens housing, which houses the video camera (or at least the video camera lens and some of the related electronics per my suspicion). I was unable to find a lot of information about glass itself, but I suspect it provides the minimum level of magnification for the camera and protects the electronics behind it.
In the middle of the objective lens housing, we find a focus ring which is responsible for focusing the camera and getting a sharp target image. The motion of the focus ring is smooth and while I find myself fiddling with it often I don’t have any complaints. It’s easy enough to adjust to get a very clear image without disturbing the sight picture.
As we proceed past the objective lens housing, we get to the main tube. I suspect there isn’t much in the tube besides some wiring and perhaps some other electronic components. The purpose of the 30mm tube seems to me to be to provide a standard mounting platform to attach the scope to a rifle via the owners preferred 30mm cantilever mount or scope rings.
Next up we arrive at a rectangular box which houses a good portion of the electronic components and provides the vast majority of the controls for the device. On the left side, where one would expect to find the illumination or parallax knobs (and perhaps a battery compartment for an illuminated reticle) on a traditional scope, we find the zoom knob (or magnification control). On the opposite side, where one would expect to find the windage turret, we find a MicroSD card slot (for storage of photos and videos taken with the device) and USB-C port (for charging the internal lithium battery with an estimated 18 hour battery life). On the top, where one would expect to find an elevation turret), we find a five button keypad used for controlling the vast majority of features and functions of this device. The buttons themselves are shaped for easy identification via touch and provide very good tactile feedback when pressed.

Behind the control box, we find another small section of 30mm tube. Again with the obvious purpose of providing a place to attach the rear scope ring or the back ring of a cantilever mount.
At the very back we find the ocular housing which houses the digital display and a display focus ring which is used to dial in a crisp and sharp reticle and heads up display features. Again like the focus ring found on the objective lens/camera housing, the motion on the focus ring is smooth and stays in place one set up.
That covers the scope from a physical perspective. However, there is so much more to cover from technical, functional, and usability perspectives. Before I dive into those aspects, I want to take another pass at the included scope rings and bit on the 30mm tube sections of the scope. First off, the rear 30mm tube section on the scope isn’t very long. This translates into very little range to adjust the eye relief on rifles with a small rail to attach the scope to or a lot of reattaching the rings to a rifle with a large rail section to attach the scope to. It’s a small thing, but I think having equal length front and rear tube sections on the scope would make the mounting process a lot easier in terms of optimizing the eye relief.
Another thing to mention is that the scope rings leave a lot to be desired. While it’s nice that they are included in the purchase, the torque specifications for the base screws seem to be too light for mounting on an AR-10 rifle. I found the base screws loose after shooting 20-30 rounds of .308 Winchester and in need of re-tightening. Additionally, no torque specifications were provided for the ring screws. I found the supplied hex head screws to start stripping even when applying a very modest 10-12 inch-lbs of torque. All in all, I strongly believe one should forego using these rings and using higher quality rings to mount the scope with.
When looking at the ATN from a usability point of view which encompasses the technical and functional aspects, I find myself torn. There is a lot of cool stuff going on, but at the same time there are a lot of things I found annoying or frustrating. I’ll cover a few, but it’s not an exhaustive list.
Let’s start with the MicroSD card, which is not included. The MicroSD card is needed in order to update the firmware (or software) which is the one of the very first setup steps recommended in both the manual and the quick start guide. It’s also required in order to capture photos and videos directly from the ATN scope. One of the marketed selling features of the scope is the “recoil activated video which is designed to capture those excellent hunting moments. The scope supports MicroSD cards with storage capacities from 4GB to 64GB which run from as little as $8 to $35. Being an essential component to marketed features and set up steps, why isn’t one included in the box? It’s not a big deal, but a little annoying.
Next, the firmware update thing got under my skin because the instructions ask one to download the firmware from the ATN website, put in on the SD card and install it. Sounds easy enough. That is until one learns that procedure doesn’t apply to the X-Sight 4K. This ATN scope requires downloading and installing another piece of software on a Windows 10 computer, connecting the scope to the computer with the USB-C cable and running the update from the software. If one doesn’t have a Windows 10 computer, then the only option is to ship the ATN scope to ATN and have them update it. For folks without a USB-C port on their computer, they will likely need to purchase an additional USB-C to USB adapter in order to update the software. This would probably be less annoying or frustrating if the ATN scope acquired had the latest firmware installed from the factory. However, this wasn’t my case and it was missing the smart mil-dot reticle feature currently marketed on the ATN website. My complaints aside, it is pretty cool that one can benefit from new features and improvements when software updates are available without having to buy a new scope.
Another cool thing is that one can install an app on their iOS or Android device and connect it to the ATN scope. This makes it easier to configure certain features like ballistic profiles for the built in ballistic calculator and other settings. One can also stream video from the ATN scope to the app, which can be pretty cool to scan the environment without having to perch behind the scope. Again, a cool feature. However, the mobile app is clunky, didn’t save configurations reliably, and I had it crash from time to time. Additionally, certain features on the scope were disabled while streaming to the application like capturing a photo, capturing a video, and the recoil activated video which I found both frustrating and annoying. Now according to the marketing material, one should be able to hunt, record 1080P video and stream 720P video simultaneously, however, that was not my experience. This could be chalked up to user error or not having the latest firmware update. Either way, I was a bit disappointed.
Another heavily marketed feature is the “one shot zero”. The way it is designed to work is that one the zero function is engaged the shooter takes a single shot at a target at a known distance with the reticle aimed at the center. Then a secondary reticle is moved using the primary keypad (or zoom scroll wheel) over the point of impact while maintaining the primary reticle centered on the point of aim. Once the settings are saved, the second shot taken should impact the point of aim. Cool, right? On the surface, I would agree that it’s cool. However, there are a few shortcomings. First, is that it assumes the rifle is super stable and shooter error is not an issue. Shooter error can be remedied by shooting a group and placing the secondary reticle over the center of the group before saving the settings. Even so, every press of the keypad disturbs the sight picture unless the rifle is locked into place – this might be possible at a shooting range, but in the field it’s unlikely. Now it may simply be my familiarity with sighting in traditional optics, but I really did miss my elevation and windage turrets during the sighting process.

The ATN scope can be configured with a few different reticle styles and colors. On the surface, this was pretty cool. Functionally speaking the reticles don’t offer anything more than an aiming reference. The exception to this might be the smart mil-dot reticle that was not available to me. The issue I had with this is that I was unable to make any wind or elevation holds with the built in reticles. At the same time, the only way to dial in a windage or elevation adjustment requires a number of button presses on the control key panel to enter the distance for an elevation adjustment, additional button presses or syncing with the mobile device application for windage adjustments, and a good ballistic profile for the device to provide an accurate windage and elevation adjustment. This might be a user familiarity issue, but I was annoyed by this a number of times.
I’ve complained a bit about several features and functions. Again, I think it’s important to point out that some of that comes from me comparing this ATN scope to traditional scopes I’m familiar with and another part comes from my lack of experience with other NVDs. Take that for what it is, but I believe that folks familiar with traditional rifle scopes are likely to find similar annoyances and frustrations when stepping into the NVD game like I have with this ATN scope. I’m not saying that’s a bad thing. Rather, I’m just saying that’s my honest experience thus far.
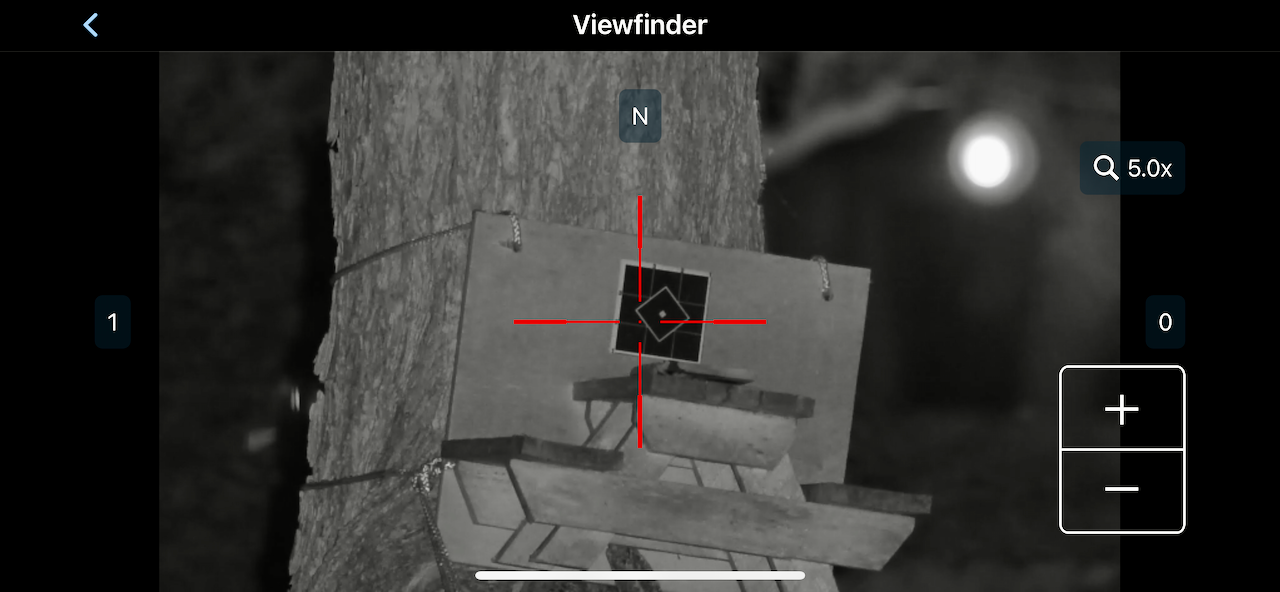
With all that said, I do have to admit that I am pleasantly surprised by the quality of night vision capabilities. Again, this might be simply because I’m new to the NVD game. However, I currently think this is a good way to get into it without taking out a second mortgage. The following set of images (taken as screenshots from the iOS application) should provide an idea of what is possible in terms of night vision with the ATN scope. I will also add that the image quality is noticeably better when viewing through the device than it is in the saved images and screenshots taken with the mobile device.

Without night vision 
With night vision, but no IR illumination 
With night vision and low IR illumination 
With night vision and medium IR illumination 
With night vision and high IR illumination
If I was to summarize my first impressions, then I would say that, out of the box, the ATN is a good starting point for folks who want to get into night vision to get their feet wet. It’s not perfect, but one gets a lot of value without having to spend a whole lot more. The one thing I strongly suggest is to invest into some decent 30mm aftermarket scope rings. I might even go so far as to say, it’s worth investing in a mounting solution that allows for quick and easy detachment and reattachment of the scope so that it’s easier to charge and update without having to have the rifle attached to it. Something about plugging a rifle into a wall charger feels off to me. Especially if I want to recharge or update the scope overnight and want to keep my rifle secure in a locked case or safe.
While I do think the ATN scope is a good starting point for getting in the NVD game, it leaves a lot to be desired as an optic, especially in good day light conditions, which I think adds to the argument for a easy to detach mounting solution so a different optic can be used during the day. I’m not saying the ATN scope won’t work for day time applications. I’m simply saying that there are a lot of scopes on the market that will function a lot better when night vision is not needed. This makes me wonder if perhaps a good traditional scope with a night vision clip-on attachment, like the ATN TICO LT, might be a better way to go. However, that route does require a larger upfront investment.


2 responses to “ATN X-Sight 4K Pro 5-20x Smart Day / Night Riflescope”
[…] the DD5 out on a hunt a few weeks ago which gave me the opportunity to spend some time behind the ATN X-Sight 4K Pro digital rifles scope. I purposely held off from sharing my experience with it because I wanted to […]
[…] time hog gun proved to be a disaster. To make matters worse, I wasn’t overly impressed by the ATN X-Sight 4K Pro 5-20x Smart Day / Night Riflescope I slapped on it. Nevertheless, I wasn’t ready to call off the […]