
I deeply enjoy listening to hunters tell their hunting stories.
There is something almost magical about the storytelling process that allows the storyteller to recollect memories in a way that somewhat relives the moment as the smallest details make their way from the recesses of the mind to tip of the tongue. The smells. The way the wind was blowing. How the clouds were moving. The sounds of the environment. Sometimes, the feelings of the experience reemerge and are expressed in the face and the eyes of the teller.
Those listening to the story, who have experienced similar things, sometimes recollect their own experiences and eventually a conversation starts taking place between the storyteller and the listeners. The conversation sometimes sounds like a handful of folks comparing notes as more and more details are remembered and disclosed. And every now and then somebody asks, “how far was that deer?” Different answers are given, but I’ve noticed that the less experience a hunter has the less confident and more vague the answer is.
This brings us to the point of this post. It’s important to have a good idea how far that game animal is before pulling the trigger. The main reason for this is to make sure that we aren’t about to take a shot that is beyond our abilities.
One might wonder, how do we know if a shot is beyond our abilities? The simplest way to do this is to find a target that is about the average size of the game animal’s vital zone and shoot at it at longer and longer distances until one starts missing it. A typical medium sized deer in North America has a vital zone area of about 10-11″. This means we can use a 10″ paper plate as a good target to practice with and figure out what our maximum distance is.
I suspect that right about now some readers are starting to think that this post doesn’t apply to them because they exclusively hunt in terrains where a shot beyond their ability is highly improbable. Those readers might not find a lot of value in the rest of this post. However, I think that some of the ranging strategies and techniques I’m about to cover are still valuable.
The easiest, fastest, and most accurate way to get a distance on a game animal is to use a rangefinder. I’ve been a fan and continue to make use of the Vortex Fury Binoculars which have a built-in rangefinder. I find the dual purpose function of the range finding binoculars to be fantastic since I make heavy use of both binocular and range finding functions. Unfortunately, quality glass is expensive and quality range finders aren’t exactly easy on the budget. A standalone long distance rangefinder like the Vortex Optics Razor HD 4000 is going to set one back a little under $500. I also wouldn’t suggest cutting corners and going with a rangefinder designed for golf as it may not provide horizontal component distance calculations (which take target elevation differences into account). Not to mention that the really inexpensive ones likely won’t hold up the elements encountered by hunters. While range finders are great tools and I encourage folks to invest in one, the cost can be prohibitive.
So what can one do if a range finder is not an available option? There are a couple of options.
One option is to use known landmarks as distance indicators. This technique is great for folks who frequent the same hunting grounds. For example, one can pace the distance between a hunting blind and a feeder or the distance between a stand and particular tree or brush line. If one happens to own the property or can get permission from the property owner, then one might also be able to deploy “wind socks” to function as both a distance indicator and to help with wind calls. However, this option doesn’t work for everyone. Even folks who can make use of this technique may not be able to use it if they have a hunting opportunity on unfamiliar hunting grounds.
This brings us to the final option I’ll cover in this post: using the riflescope reticle as a ranging tool. This technique requires using a scope with elevation or windage hash marks. A bullet drop compensation (BDC) style reticle can also be used as a ranging tool although it’s not optimal as it can only provide coarse distance estimates. Given there are many different style reticles, I’m only going to dive into how to estimate ranges with one reticle. This technique can be adapted to work with any reticle with the exception of the pain duplex or simple crosshair reticles that do not provide any elevate or windage hash marks. If you are currently in the market for a hunting scope, then I will also suggest reading this other post that covers reticle considerations for hunting applications. Let’s get into how this works.

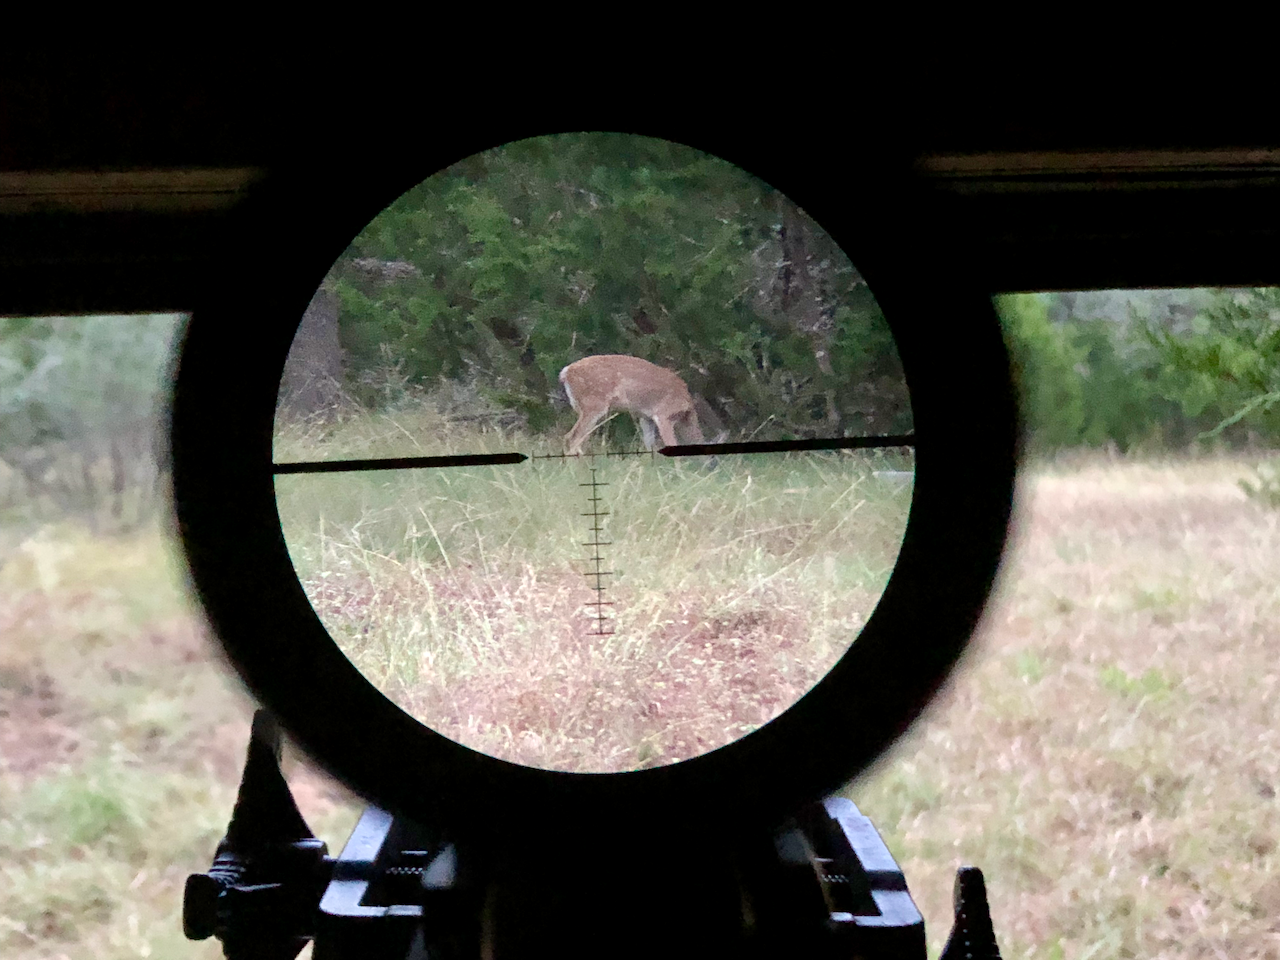
The hash marks in a reticle are angle measurements. As such, we can use them to measure a game animal and assuming we know a typical measurement of the game animal we can figure out approximately how far the game animal is by applying a little bit of math. For example, a medium size deer measured from the top of it’s back to the brisket is about 17″-18″. Given than 1 minute of angle (MOA) is about 1″ at 100 yards, at 100 yards a medium sized deer when the center point of the reticle is placed on the top of the back then the bottom of the brisket should measure about 17 to 18 MOA like the deer and reticle pictured above. If it measures more MOA, then it is closer than 100 yards. If it measures less MOA then it’s further away. We can use a simple formula to estimate the actual distance:
size in inches ÷ size in MOA * 100 = range in yardsTo be clear, that is a simplified version of the formula that is easy to remember. To get a more accurate distance or a distance using metric system measurements we can use the following formulas:
size in inches ÷ size in MOA * 95.5 = range in yards

size in centimeters ÷ size in MOA * 34.38 = range in meters
Folks using a second focal plane scope, that is a scope where the reticle does not shrink or grow as the magnification is decreased or increased respectively, should be aware that this technique only works when the magnification of the scope is set to the magnification the reticle is scaled for. For most second focal plane scopes, this will be the highest magnification setting. However, check the owner’s manual to confirm.
There are ranging formulas for milliradian (MRAD) based reticles. They are as follows:
size in inches ÷ size in MRAD * 27.77 = range in yards

size in centimeters ÷ size in MRAD * 10 = range in meters
I suspect some folks are thinking that they don’t want to memorize formulas and do calculations out in the field while hunting. I don’t blame y’all. That is not something I want to do when I have spotted a game animal either. Instead, I’d rather bring a long cheat sheet I can quickly reference or even memorize some values from (at least for typical distances). The following table provides the MOA and MRAD measurements for an 18″ back to brisket medium sized deer at distances from 50 yards to 400 yards in 50 yard increments rounded to the nearest whole MOA or nearest half MRAD value.
| Distance | MOA | MRAD |
|---|---|---|
| 50 yards | 34 | 10 |
| 100 yards | 17 | 5 |
| 150 yards | 11 | < 3.5 |
| 200 yards | 9 | 2.5 |
| 250 yards | 7 | 2 |
| 300 yards | 6 | > 1.5 |
| 350 yards | 5 | < 1.5 |
| 400 yards | 4 | > 1 |
That table might not seem like something easy to remember. It’s also likely that a hunter is only going to care about either MOA or MRAD, but not both. Additionally, the hash marks might not be available in the same increments provided on the table above. If this is ringing a bell, then I suggest making a table corresponding to the hash marks available on the reticle found in the rifle scope that is mounted on the hunting rifle. For example, the reticle in the picture above has MOA hash marks in increments of 2. So a customized cheat sheet for that reticle for hunting medium sized deer might look like the following table:
| MOA | Distance (using 95.5 multiplier) | Rough Distance (using 100 multiplier) |
|---|---|---|
| 24 | 72 yards | 75 yards |
| 22 | 78 yards | 82 yards |
| 20 | 86 yards | 90 yards |
| 18 | 96 yards | 100 yards |
| 16 | 107 yards | 113 yards |
| 14 | 123 yards | 129 yards |
| 12 | 143 yards | 150 yards |
| 10 | 172 yards | 180 yards |
| 8 | 215 yards | 225 yards |
| 6 | 287 yards | 300 yards |
| 4 | 430 yards | 450 yards |
| 2 | 860 yards | 900 yards |
With a table like this, I might focusing on remembering the MOA marks associate with nice round rough distance values such as 18 MOA for about 100 yards, 12 MOA for about 150 yards, ~9 MOA for about 200 yards, ~7 MOA for about 250 yards, 6 MOA for about 300 yards, and so on. I might also place an emphasis on remembering the smallest MOA value where the distance exceeds my ability or the effectiveness of the cartridge. I might also place an emphasis on remembering the smallest MOA value where I might need to slow down and perhaps using additional tools before adjusting an elevation hold and making a wind call. Again, having a good idea of how far the game animal is before taking a shot is critical to ensure we aren’t taking a shot one can’t make or a shot that won’t ethically dispatch the game animal.
Do you have a different approach? I’d love to hear it! Post it in the comments below.


One response to “How Far is that Deer?”
Thanks for this article. They just allowed muzzleloaders to have 1x optics in the state of WA. This is very helpful for my etched reticle. Now I have a cheat sheet for both deer and elk!